One of the biggest chores when heading into the backcountry for multiday trips is figuring out what to eat. For me, this is one of the most time consuming tasks because I like to eat homemade food that doesn’t weigh a tonne.
Of course, the easiest and fastest way to feed yourself in the backcountry is to purchase prepared meals from Mountain Equipment Co-op. Gourmet meals can be purchased from Yamnuska Mountain Adventures. I have eaten my fair share of MEC meals, but have not tried Yam’s. Although, I did share a hut with the celebrated guide Barry Blanchard who was serving up Yam’s food to his clients. The food did look amazing.
Why do I make my own backpacking meals?
Less Expensive
Pre-made meals are not cheap. I can make several dinners for four people for the same price as one purchased package. Backpacking meals are usually pasta and beef based, which are not expensive ingredients. Pre-made meals are expensive due to the time it takes to prepare and dehydrate the ingredients. I have the time, so I decide to spend that instead of money.
Serving Size
I like to control how much I eat. I often feel hungry after eating a prepared meal, wishing there was a bit more left in the bottom of the bag. When I prepare my own food, I can have some larger meals for those days I exert more energy, or am on the trail for hours at a time.
Same goes for the shorter days, or day trips from the hut. I don’t always need a mondo meal. By preparing different package sizes, I can decide how much to prepare for each meal. This is very important because you MUST eat everything you prepare. There are no refrigerators in the backcountry, and carrying out heavy reconstituted food absolutely bites.
Ingredients
I like to know what I’m eating. I have no allergies, and I’m not a total health nut. However, I do like to use fresh ingredients that are not covered in salt or sulfates. Since homemade dehydrated meals are not made for long shelf storage, I can leave out all the extra preservatives.
I can also control the quality of the ingredients. I always buy fresh ingredients at the height of their flavour. Do not be tempted to use over-ripe or stale ingredients because this affects your finished meal.
Taste
If you’ve never done a big multiday trip, then this might surprise you. EVERYTHING tastes AMAZING in the backcountry! My brother-in-law once ate dehydrated mashed potatoes on a backcountry trip, and loved them so much he bought boxes of them to eat at home. After one spoonful, he realized that a big pack and a long day really affects your appetite and your taste buds.
So if everything tastes great in the backcountry, why worry about flavour? Well, unfortunately, not everything tastes great. I recently did a group backpack trip with shared food. One of the meals was made with dried cheese purchased from a bulk store. The cheese was so salty that it actually hurt my throat. I could barely choke it down, and gave half of it away. And this was AFTER a 20 km day going over two mountain passes when I was really hungry.
If I make the meals myself, I am guaranteed to like it, and to eat it. This is vital when I’m putting up big days and expending lots of energy.
Dehydrating Basics
First off, this is not rocket science. Go ahead and experiment with whatever foods you like. I was recently helping a friend who is originally from Vietnam. She wanted to dehydrate some of her specialty meals and soups. We came up with solutions to dry the whole meal, even the lettuce type veggies.

Before I purchased my own dehydrator, I borrowed one from my in-laws. Theirs did not have any heat settings, and the air came up from the bottom. After using this one for several years, I do appreciate the ability to change the heat, especially if I need to run out for a few hours.
If you are new to dehydrating, you don’t need a fancy machine with a lot of settings. Your oven will work great – all you need is a low setting and lots of time. If you have it, use the Convection Bake setting as the fan will help dehydrate a bit quicker and more evenly.
If you are planning on doing a lot of dehydrating, then by all means invest in a good machine.
Loading the Dehydrating Trays
When placing food on the dehydrator trays, ensure everything is only one layer deep. You need as much air circulating to dry the food quickly and evenly.
It is okay for foods to be packed closely side by side though, as the food will shrink as it dries.

The pineapple is packed fairly close together.
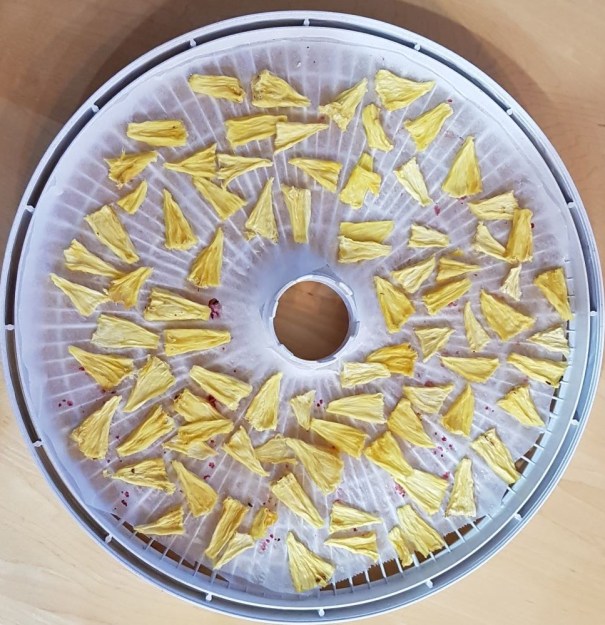
The pineapple has dried to less than half it’s original size. Do not be alarmed – I already used this parchment paper to dry raspberries. The red dots are stuck on bits of raspberry juice.
How Long to Dehydrate Food
Everything takes a different amount of time to dehydrate. It really depends on how dense the food, and how much water it contains. For example, pineapple takes the longest because it holds so much water, whereas raspberries are done fairly quickly.
Check your meals frequently. I dehydrate in the garage so I don’t have to listen to the fan going. I like to set an alarm to go off every 2 – 3 hours to remind me to go check.
It is possible to over dry your food. I did this once when making chili. The beans were over dried and refused to reconstitute on the trip. Blah!
If you are dehydrating a meal with different ingredients, then be prepared for some ingredients to dry faster than others. Go ahead and pick through the trays to remove the dried parts. This will help prevent over-drying.
If you are dehydrating messy or wet foods, some dehydrators come with plastic tray liners. If you don’t have these, you can also line your trays with parchment paper. I will sometimes use parchment to prevent the trays from getting covered in juices that are hard to clean. This works especially well for raspberries and beef jerky.
Portion Sizes
Know in advance how many people your meal will serve BEFORE you dehydrate. Everything looks so incredibly small after it’s dried, that you can accidentally overfeed yourself. When first starting, pick meals you make regularly so you’ll know how many people it feeds. For example, lets say one tray of lasagna feeds four people for two meals. Once the lasagna is dried, divide the meal into 8 equal portions.
I will show you below how to portion out meals once everything is dehydrated.
Dehydrating Meat
Beef is by far the easiest to dehydrate and reconstitute. It always works and tastes great. I use ground beef in most of my recipes, plus I always make a big batch of beef jerky for the season. I have dehydrated bacon for breakfast – now that was a treat!
Chicken is a problem. For whatever reason, you cannot dehydrate cooked chicken. It must first be pressure cooked. If you don’t have a pressure cooker, simply use canned chicken.
I have not tried dehydrating fish, and the reason is the smell! When you are cooking in the backcountry, you need to be mindful of the wild animals, especially bears, cougars and wolves. Cooking very fragrant food is an attractant for wild animals. Even if you don’t see the bear that night, they will come the next morning once everyone is packed up to see what may be left behind. A fed bear is a dead bear.
I also don’t cook fish in shared huts. You wouldn’t want someone to stink up the place, so don’t do it to others. Many of these huts, especially in winter, do not have windows that open.
Recipes
There are many online sites that specialize in dehydrated meal recipes. I don’t use them because they often call for processed ingredients. Also, it’s so easy to dehydrate your own recipes. I am writing this blog to make it EASY for you to start making your own backpack food.
Here is one of my favourite backpacking meals. I encourage you to try and dehydrate any meal that you love.
Homemade Beef Macaroni and Cheese
This is a classic meal (for North Americans at least!), one that everyone loves and is always ready to devour. I will not give specific directions or ingredients, because frankly, just do what you want. There is no right or wrong – have fun, and give yourself permission to experiment.
Meat Sauce
Brown the ground beef in a frying pan. Ensure the fat is well drained, and fully cooked. Crumble the beef into the smallest bits possible. The smaller the bits, the faster it dehydrates. Large chunks of beef may seem dried, but may have a soft centre. Take the extra time to prepare the beef.
Add any vegetables you like, like onions or peppers. Chop these into small chunks – again, the smaller the better for drying.
Add in pasta sauce. This can be store bought, or make your own.
Spice the meal as you normally would. Do not skimp on this part, as you want the meals to be as tasty as possible.
Once the sauce is fully cooked, line your trays with parchment paper or the plastic tray liners. Spoon sauce onto the trays in even thin layers. It’s better to use more trays than less.
If all your chunks are about the same size, then you might get lucky and it will dry in the same amount of time. If not, then remove the dried parts to prevent over-dehydrating.

This is the dried meat sauce. The ground beef is crumbled into small bits, and the onions are chopped finely so as not to be seen. When removing the sauce, crumble it in your hands before putting it into a bowl.
Once the sauce is dried, combine everything back together into one bowl, and set aside. Ensure that EVERYTHING is included, including the spices. You might be surprised to see how much the spices separate out, so don’t accidentally toss them out.
Pasta
When you buy pasta, it is dried but not cooked. If you want a meal where you just add water and reheat, then you need to dehydrate COOKED pasta. This is ideal if you are tenting and carrying your own stove and fuel. It means that you don’t have to boil water, boil the pasta, drain the pasta, and then toss the pasta water.
If you are staying at a well equipped hut like the ones offered by the Alpine Club of Canada, then you can choose to skip this step. The ACC huts come with stoves and fuel, usually a giant propane tank outside.
Cook the pasta to the desired level of tenderness. I prefer to cook my pasts so it is soft all the way through. This way I know for SURE that it is fully reconstituted because the pasta will be soft.
Rinse the pasta, and remove as much water as possible. Consider patting the pasta dry with a kitchen towel, or let it drain in a colander.
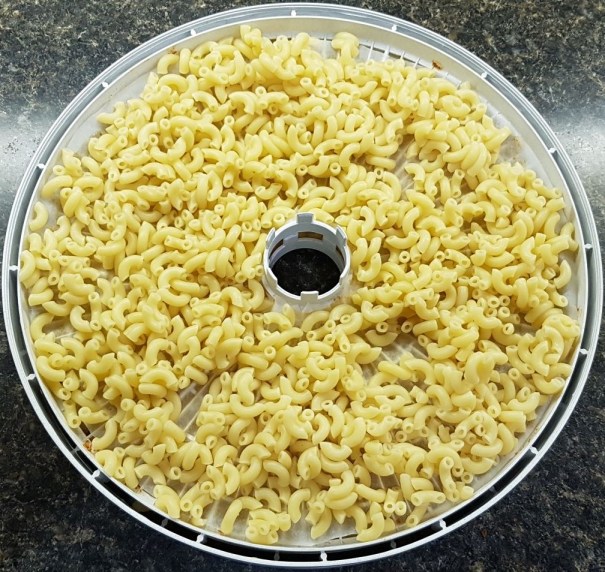
This is the cooked, but not yet dehydrated pasta. Go ahead and load up the trays. Pasta dries fairly quickly and can be stirred often on the tray.
Spoon the pasta onto the dehydrator trays. Keep an eye on the pasta as it dries fairly quick. When done, it will look exactly the same as the dried, uncooked pasta, so keep it separate!
Put all the pasta together into a bowl, and set aside.
Cheese Sauce
This is where I like to cheat. When making homemade macaroni and cheese, I will make my own white sauce and add cheese. For backpacking, I buy good old Kraft Dinner. The cheese sauce always reconstitutes perfectly and it’s a childhood “comfort food”.
The directions call for milk and butter to be added to the sauce. I always bring powdered milk for my breakfasts, so I just add the extra amount needed for the sauce. Skip the butter because we are adding beef sauce instead.
Measuring Portion Sizes
It’s possible to measure portion sizes two ways. The first is to eyeball it based on size. The second is to weigh your food, and divide it equally using a scale.
I recently purchased a digital kitchen weight scale. It has made my life so much easier, especially for portioning out dehydrated food. What looks equal can be quite a bit different in weight.
First, weight the pasta sauce.
Divide the sauce into serving portions. This recipe makes four portions. I made it for my recent Bonnington Traverse trip for my husband and me. As we are sharing meals, I simply divided it in two as we would eat two portions (one for each of us) on two separate nights.
Put the sauce into a freezer bag with a good zip.
Next, weight the noodles, and divide by two. Add the noodles to the freezer bag.

This is the dehydrated pasta. it looks exactly like regular uncooked dried pasta, so don’t get it mixed up. My kitchen scale has a ‘zero out’ function. This means I can place a bowl on the scale, and then the scales goes back to zero so I am only weighing the food, not the bowl.
Add a Kraft Dinner cheese sauce to each bag. If you don’t use powdered milk for any other recipe, go ahead and add a small bag of powdered milk to each freezer bag.
Seal the bag. Label it – you would be surprised how everything looks exactly the same when dehydrated. This is optional, but I write down how much it weighs. I then combine food packages based on weight, and divide them out among the backpacks.
You can also write cooking directions on the bag, to remind you to add the powdered milk or anything else you might forget.

The finished meal! Each bag holds two portions. At 332 grams, this is one light weight but very filling and nourishing meal.
Storing Dehydrated Food
While dehydrated food is preserved, it’s best to keep it fresh until you are ready to use it. If you are making meals for a trip a few weeks out, then store your prepared meals in the freezer. If you are headed out right away, then store your meals in the fridge.
As long as they stay dry, dehydrated meals will last the duration of your trip. Probably longer!
Reconstituting Dehydrated Meals
Unfortunately, I never thought to take a photo of the prepared Beef Macaroni and Cheese while on my latest trip. Suffice it to say, it looked and tasted great with minimal fuss and work. This was a good thing, because the huts had limited cooking space, and washing up was a pain.
When you arrive at your destination, pour the contents of one meal into a pot with a lid. Boil water. Pour in enough water to cover the meal. Let it sit while you take care of other chores or relax. Check every 30 minutes or so, and add hot, boiled water as needed.
You are waiting for all the ingredients to puff back up to their original size, and to be soft all the way through. If the water is all gone, but the ingredients are not soft, then continue to add water. If you have accidentally over-dried the food, no amount of water will bring it back to life.
When you are ready to eat, heat the meal over a stove until it’s hot throughout. Add in the cheese sauce. Stir up the needed powdered milk with the required amount of water, and add to meal. Stir until it’s all mixed together.
Serve, and enjoy!
Can you Eat from the Freezer Bag?
Yes, this is definitely possible. You can submerge the plastic bag into boiling water to heat thoroughly. Do not use regular freezer bags, but instead the special Food Vac bags that are meant to be submerged in boiling water.
Or, you can purchase the “Just Add Water” foil bags that the commercial producers use. Add boiling water, stir, seal, and wait. Either of these methods ensure no dishes to wash.
Another method is to use a heat proof or metal mug. Pour the serving directly into the mug, add water, cheese sauce and milk, and heat over the stove. This saves one pot, but you’ll still have to wash your mug.
If you found this post useful, please do me a huge favour and click the Star button to “Like” it. You can also click to follow my blog, or head on over to Facebook and join my page – Al’s Adventurers.
I love all things mountains! I live next door to the Canadian Rocky Mountains, however I travel the world to enjoy the many different mountain environments and cultures that I can. I hope you enjoy these trip reports, and that it inspires you to accomplish your own adventure goals.

Great read. This is excellent for backpacking trips.
Absolutely! Light weight food that you can prepare yourself is perfect for any multi-day trips. How to dehydrate is one of the questions I get asked the most.
Our last trip was to Maroon Bells, Colorado. We saved a lot of expenses by dehydration. I will need to get cuaght up on reading your site. I may just learn something!
Did you write about your trip to Maroon Bells? It sounds amazing. If you did, please put a link here as I would love to read about it. My nephews live in Colorado, and I’ve been meaning to do some backcountry trips there with them.
It was prior to this blog. I do have a lot of pictures and could very easily write one down the road.
Well, please let me know when you do!
Sure thing!
Thanks! I am saving this post for later, my dehydrator has been sitting untouched because my big hiking trips have been cancelled this spring. Fingers crossed that I will be able to use it this summer!
I feel your pain. I don’t have any backpacks booked because I wasn’t sure if anything would be open. Plus, it’s not ideal to travel to other provinces, so it might be single day trips for me. The good news – you can make some meals in advance and freeze them for later. It makes packing for the actual backpack a bit easier if the food is already taken care of.
Hello ma’am, I m just thinking and trying to ask about this subject ( dehydrate) to you. But after reading this post my questions solve and getting my answer. One more think you really lots of work to write this post. Thank you..
Hello Amit, I am so glad you liked it. Many people get intimidated by dehydrating their own meals, but it can be very simple and stress-free. I’m glad your questions were answered, and thank you for the feedback. Very much appreciated! Happy Trails!
Hello, approximately how long does it take to reconstitute this meal? Is it more than 30 minutes? Thanks!
Hi Natasha,
30 minutes or less, for sure. When I get into camp, or into the hut, I put the ingredients together in a pot and add hot water. I cover, and let that sit until I’m ready to eat. By then, the initial water is soaked up. I then add more hot water and start heating the meal on the stove.
Some people add water to their dinner meals at breakfast, and allow them to reconstitute all day. Personally I think that defeats the purpose of a dehydrated meal.
As long as you don’t over dehydrate your ingredients, all meals should rehydrate fairly quickly. If you’re in a rush, 10 – 15 minutes would suffice.
I hope that helped. Please let me know any other questions.
Alisen