August 22, 2018
This is Day Three of a three day backpack starting from Sunshine Village and ending at Vista Lake off Highway 93 South. Click to read about Day one and Day Two.
There was some cloud (or wildfire smoke???) cover overnight, so the temperature stayed fairly warm. After a quick airing out of the sleeping bags, we could pack up the tent and fly and get moving. We were taking out some people new to backpacking, and they were getting into the groove: packed up and ready to go in record time.
Overview
Day three offered a few challenges. First, I was trying not to punch out the rude people staying at Shadow Lake Lodge. Second, the wildfire smoke was really getting thick, making breathing difficult. Third, unlike the previous two days, it was all elevation gain and loss with two passes and a massive descent down to Vista Lake.
Trail Head
From the Shadow Lake campground, backtrack on the trail a bit until you come to the junction towards Gibbon Pass. This is an uneventful trail through a tight forest with not much for views. The trail was in great shape, with switchbacks to make the elevation gain manageable.
Main Trail
As we gained elevation and neared Gibbon Pass, the spruce and pine forest thinned out, allowing the larch trees to grow in abundance. This would make a gorgeous fall hike to see the larches in their bright yellow colours.

The meadows are full of wildflowers. We are too late in the year for the best display. Usually early July is a good time to catch them at their best.
Gibbon Pass
As we neared the pass, the elevation leveled out, and the great panorama of the Ball Range was before us.

The Ball Range is very impressive. We followed it for basically two full days, and I never once tired of its company. So thankful to live near these strong Rocky Mountains.
Gibbon Pass is where we found the worst of the tourists. It’s a short trek up from Shadow Lake Lodge, and we encountered a number of young bucks without packs. If you do a lot of mountain hiking, you know there is a certain amount of etiquette involved. First, respect the environment and don’t tread all over the fragile plants. Stay on the trail. These idiots were running all over the place, trampling flowers and bushes with no care or though to the damage they were causing, or the years it would take for the plants to recover.
Second, be mindful of others. Everyone is there to see the view. Everyone wants to get “The Shot.” Move along once you’ve had your turn. Not these tourists. A second group planted themselves right in front of the Gibbon Pass cairn marker and were just chit-chatting. Despite my group of four surrounding them in a semi-circle and staring pointedly, they refused to move. I finally had to ask them to move aside (which caused much huffing) so we too could A) see the marker, and B) take a photo of it. Then, as I was hunched down to take my photo, another tourist actually ran in front of me, took a bunch of shots, and then ran off to trample some more pristine alpine environment.
Third, no one wants to hear how much you drank the night before. Being in the mountains is a peaceful and cathartic experience for many. When you are backpacking, there is a certain amount of self-reliance and the joy that comes from that. Being able to enjoy a pass in peace is needed, especially when you have a long day ahead.

The Gibbon Pass cairn marker. Despite the yahoos you get from an easily accessible lodge, this really was a gorgeous and peaceful moment in our day.
Distance to Gibbon Pass is about 3 km from Shadow Lake Campground. The elevation is about 456 m (1,500′). Time was 1 hour and 30 minutes.
From Gibbon Pass, we left the tourists behind and had the rest of the trail to ourselves. Our next destination is Twin Lakes, which is a short descent, and then up another small pass. It was here we met a guide with his two Japanese clients. We swapped tales of daring-do, and then proceeded to play leap-frog with them the rest of the day as our rest stops were not synchronized.

The trail from Gibbon Pass to Twin Lakes is a gentle descent, with a mass of larch trees. People hunt for these in the fall for their amazing colour changes.
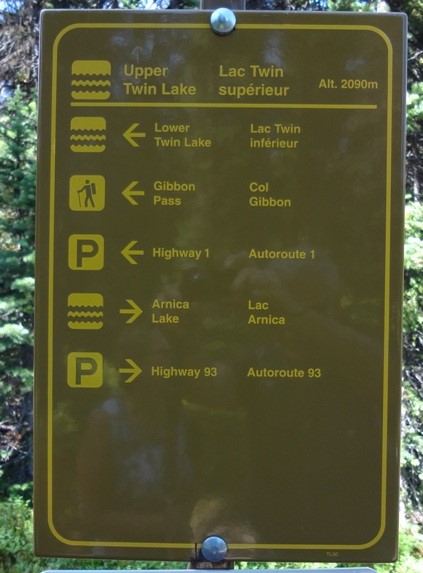
Twin Lakes
We then descended down to Twin Lakes, with an elevation loss of about 276 m (910′). We arrived at 12:45, which was 2 hours and 45 minutes from Shadow Lake Campground, and 1 hour and 15 minutes from Gibbon Pass (including about 15 minutes of view admiration and tourist scolding). Twin Lake are 5 km from Gibbon Pass, and about 8.7 km from Shadow Lake Campground.
As you can see in the photo below, the air is thick with smoke. Every breathe is a lungful of smoke, despite trying to not breathe too heavily, even on the uphill portions. All our gear will need to be thoroughly washed too. Not ideal, but so thankful the first two days were smoke-free.

View from our lunch spot on Twin Lakes. This is Lower Twin Lake, which is the first lake when descending from Gibbon Pass. This is the spot where two women got lost (going opposite direction), because it looks like the trail continues along the shoreline, instead of veering left to go up to Gibbon Pass.
Twin Lakes is a gorgeous spot, with it’s own campground. You could easily spread out your backpack by spending a night here, or skip Shadow Lake and go from here to the Ball campground. Lots of options.
As you can see, there are lots of options with Twin Lakes. You can make it a there and back hike, or do a short traverse.
If you don’t fancy a three day backpack, you can also do a quick weekend trip at Twin Lakes by going in either Shadow Lake or Vista Lake, and exiting the other way.
NOTE: if you are travelling from Vista Lake, past Twin Lakes towards Gibbon Pass. The trail to Gibbon pass turns LEFT at the second Lower Twin Lakes and ascends the ridge on the left, well above the lake. We met two women at Shadow Lake who continued straight at the Lower Twin Lake.They were following a substantial trail that then petered out at the end of the lake. Instead of back-tracking, they scrambled up the nasty scree at the end of the lake. It makes for a much harder day than it needs to be.
Arnica Lake
After a leisurely lunch at Twin Lakes, we ascended to Arnica Pass, the second major pass of the day. The pass itself is a continuation of the larch forests. We arrived at 2:17 pm, which is 1 hour and 30 minutes since our arrival at Twin Lakes. This time includes about a 20-25 minute lunch break. Elevation gain to Arnica Pass is about 256 m (845′).
By now, the wildfire smoke is down to ground level, and every step is a lungful of smoke. I will freely admit to just wanting to get this day over with, instead of stopping for photos.
Arnica Lake is gorgeous. On a clear day, the mountains towering above are spectacular. As you can see, the wildfire smoke completely obscured all views as it quickly filled the valleys.
We arrived at Arnica Lake at 2:41, or a little less than 30 minutes from Arnica Pass. It is about 3 km from Twin Lakes.

Arnica Lake deserved more time to admire, but with the smoke obscuring the views and filling up our lungs… Suffice to say we just did a quick walk by.
Vista Lake
After Arnica Lake, it is a long and dreary trudge down to Vista Lake. I’m rather glad I came in via Sunshine Village because heading up this long and uneventful slog with a full pack does not exactly entice.
Unfortunately, the amazing views that would have entertained us the whole way out are now completely obscured by wildfire smoke.

The ridge line in the background is Boom Mountain. There is a lovely little lake behind that mountain, and the outside wall is a popular back-country ski area.

It was only through my situational awareness that I knew Castle Mountain was even there. You can just barely make out the long line between summit and sky about 3/4 up the photo.
It is 3 km straight down from Arnica Lake to Vista Lake, with a loss of 574 m (1,895′). We arrived at 4:00 pm, which is 1 hour and 15 minutes from Arnica Lake. The trail is full of switchbacks, which helps with the descent rate but I was still glad I had my knee braces, and my hiking poles were in full extension mode to take off the pressure.
Vista Lake is long, and you walk beside it for a while before coming to the bridge at the outflow.

Vista Lake is a bit of a tease – you see it from the trail long before you can reach its cool waters.

The outflow of Vista Lake. A quiet little spot with lots of boulders and shallow water to relax after a long day.
The Cure
At the end of every hike, I love to find a stream or lake to cool my feet and wash off. After a three day backpack, my feet were swollen and my toes were getting squished inside my boots. After soaking my feet for a good 15 or so minutes, my boots magically fit again.

Mike taking The Cure. If you’ve never done this, try it. My feet felt SO good after a short soak. Washing off the dust and salty sweat also felt amazing.
Our Japanese leap-frog partners had their own version of The Cure. I have to say, theirs is a bit more intense than ours. I bet this felt really good afterwards, but it sure must hurt at the time.

The Cure, Japanese style. Dipping heads instead of feet.
End at Highway 93 South
Vista Lake to Highway 93 is an easy 1.4 km, with an elevation gain of 107 m (354′). It was a super gentle grade, and after all the passes we did over the past three days, it felt like nothing to go up this final slope.

Interesting formations on the trail. A fire had raged through here earlier, but the forest was intact.
It sure was fun to pop out at the parking lot with our big packs and looking like we’ve been out in the bush forever.

Looking back down at Vista Lake. The trail starts to climb at the far end of the lake (left) and makes its way up the side of Storm Mountain (right).
From here, we loaded the car and drove back to Sunshine Village to pick up the other vehicle. Our backpack really wasn’t complete until we headed into Banff for a burger and beer at one of their fine restaurants.
Day 3 Totals – Tracked on Strava
Shadow Lake to Vista Lake (Highway 93 South)
Date: August 22, 2018
Group: Four (Alisen, Mike and two others)
Distance: 14.9 km
Elevation Gain: 820 m (2,707′)
Elevation Loss: 944 m (3,115′)
Time: 6 hours 50 minutes (with breaks at Twin and Vista Lakes)

Day Three started at Shadow Lake (blue dot) and ended at the parking lot above Vista Lake (check dot). We contoured around the edge of Storm Mountain, and it was a real shame we couldn’t see more of this interesting mountain.

Day 3 starts at the 30.5 km marker and goes to 45.5. You can see the two main passes – Gibbon and Arnica – and then the long descent to Vista Lake. It might look like a kick in the pants to climb out of Vista Lake, but the grade is very mellow.
THREE DAY TOTALS
The backpack from Sunshine Village to Vista Lake is an absolutely gorgeous trek through some of the best scenery in Banff National Park. Stunning lakes, towering mountain vistas, and open passes – this trip has it all.
There are several other campgrounds in this area. There is the Ball campground between Whistling Pass and Shadow Lake, as well as the Twin Lakes campground mentioned above. Lots of options to enjoy your time in this amazing location.
The entire trip was 45.5 km, and I felt the distances were fairly evenly spread out between campgrounds. It didn’t feel like any day was longer or harder than the others. Without Pharaoh Peak, Day Two is the easiest in terms of elevation gains and loss, which is ideal as Day Two can often be the toughest physically.
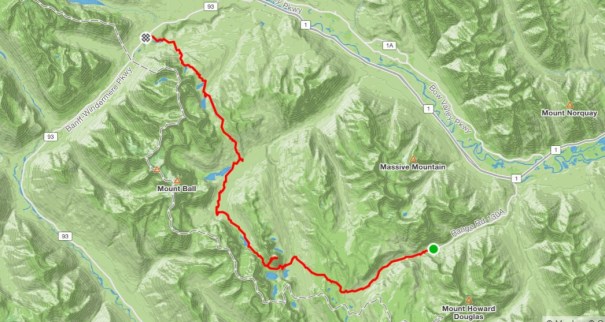
The trip starts at Sunshine Village (green dot) and ends above Vista Lake (check dot). As I look at the entire map, I see the abundance of lakes on this trip. This is rare for Alberta, which does not have the watershed that our neighbour British Columbia has. The black and white stripped line is the Great Divide and the border between the provinces.
I tracked all three days in Strava, and just hit “pause” at each campground. I have since learned that I can save an activity in Strava, even if I can’t upload it. So for this one trip, I have the entire elevation over the three days, which I think is rather interesting to see.
Total elevation gain over the three days is 2,368 m (7,814′). This is pretty good with a big backpack.
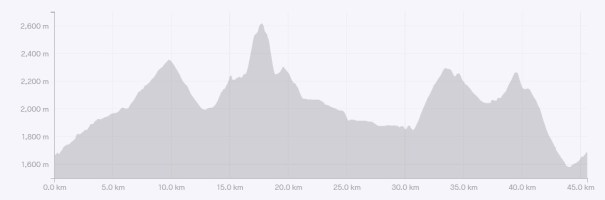
The elevation gains for the Banff Backpack are well spread out – two humps on either end, with a relatively flat spot in the middle. You can travel in either direction – it just depends on how and when you want to gain the elevation to get over the passes.
Thank you for joining me on this big three day adventure as we backpacked through Banff National Park. If you missed the previous two days, you can read Day One here, and Day Two here.
If you have any questions about the trip, please leave a comment so everyone can benefit from the clarification. I hope this was useful in your planning and exploring. If so, please share this trip report using the buttons below. You can also Like this page, or go to my facebook page Al’s Adventurers and like my page.
To see a full list of Trip Reports, please visit my Adventures in Mountains page. Trips are organized by hiking, summits, scrambles, backpacks, and skiing.
I love all things mountains! I live next door to the Canadian Rocky Mountains, however I travel the world to enjoy the many different mountain environments and cultures that I can. I hope you enjoy these trip reports, and that it inspires you to accomplish your own adventure goals.

Lovely photos 🌸💫
Thank you! Imagine it without any smoke haze. Gorgeous part of the world!
thanks for sharing your trip, looks amazing! Looking at doing this in the summer and wondering where you parked your car overnight near Vista Lake? Struggling to find the info online. Thank you!
Hi Tori,
If you start at Vista Lake, there is a small car park right at the trailhead, on Highway 95 south.
If you start at the other end, then the parking lot is the main Sunshine Ski Resort Lot.
Does that help? Happy to provide more information.
Cheers,
Alisen