August 31, 2015
August 2, 2018
Tent Ridge is one of those hikes that can be done over and over. It has some nice elevation gain, it’s a good 10 KMs to justify the long drive, a bit of scrambly hands on rock to make you feel like a hero, and a horseshoe shaped ridge that offers as many views as you could possibly want.
I first did Tent Ridge with my husband Mike and my hiking partner Annette. She had read about this route years prior in a local Calgary newspaper, and had tucked it away on her To Do List. We hiked it late August, and were hit with our typically strong (read: gale force) fall winds.
I went back with Mike, our two kids, and our two nephews from Colorado. We had limited time with the boys, so despite the weather conditions not being ideal, we decided to make the most of their short stay by hiking Tent Ridge. If time had not been an issue, we probably would not have gone. This is all part of the decision making process in the mountains.
Overview
Tent Ridge is tucked away off a side road, which in my opinion only increases its appeal. As the ridge is in the shape of a large horseshoe, the hike is actually a loop. I love a good traverse, and this one delivers. While I quite often go backwards from conventional wisdom on hikes (cough, Pocaterra, cough), I highly recommend the traditional clockwise route. Once you find the trail head, you make one right turn. From there, follow the trail up and around the horseshoe. When coming off the ridge, take the trail descending straight down. Once you hit the cut line, turn right and make your way back to your vehicle.
WINTER ADVISORY:
The latest trend is to “winter hike” or snowshoe. Many people believe that if they can hike a trail in the summer, they can then hike it in the winter. This is NOT true. Both sides of Tent Ridge sport full-on avalanche slopes. Even if you feel safe in the trees, there are large steep slopes above. Every year, people trigger and get caught in avalanches on Tent Ridge. One man died when he triggered an avalanche snowshoeing on Tent Ridge a few years ago. This is a summer only route.

This is not a great photo, but it shows the slide paths of various avalanches.
Trail Head
Take the Smith Dorrien Trail to the Mount Engadine Lodge turnoff. If you are coming from Calgary, it does not matter which way you drive – Highway 40 or via Canmore. My husband Mike made the custom beds for the lodge, and after driving both ways several times, we realized both routes were just about equal in terms of time.
Drive past the Mount Engadine Lodge entrance, cross the creek, and then turn right at the Y intersection. Drive a short ways, until you come to a widening of the road on the right (east) side. Park here. This place gets busy, so be sure to park so that others can also find a spot.
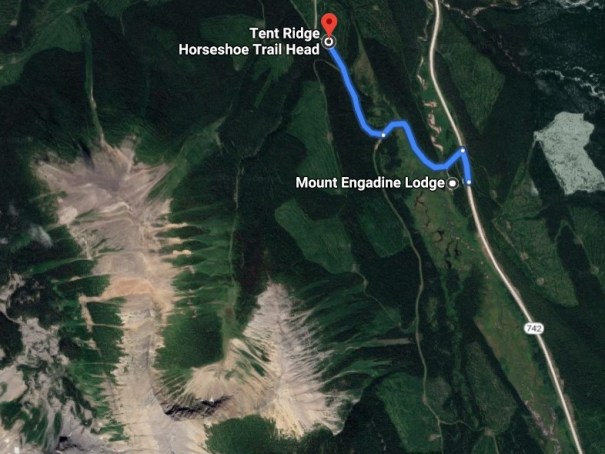
The trail head is now pinned onto Google maps, which makes finding this gem that much easier.
Finding the correct trail head is important. Do not be tempted to use the somewhat defined trail directly in front of the parking area, as this short-cut will end in tears (you’ll see why). Also ignore the very well-defined trail coming down a little hill to the right of the parking lot. This is the exit, and makes for a very heinous slog up an incredibly boring slope if you chose this direction.
(I should note – according to Gillean Daffern’s guide book, this is the traditional ‘hiking’ route that avoids all scrambling sections. If you are not comfortable with hands on rocks, then this IS your route. Please read her description in the guide book.)
Instead, walk back (left) along the side road until you hit a real sizable trail head. Take this one, and begin hiking up to the west. The trail soon turns left onto an old logging road. You will be on this connector trail for about 500 or so metres.
Look for the trail heading off to the right. The first time I was here, there was a big log across the old road, but I was so wrapped up chit-chatting I actually stepped right over it. We didn’t go far though, and quickly retraced our steps.
The second time I did the trail, I was concerned about the weather so we took the ‘short cut’. The strong trail soon petered out, and we had some nasty bushwhacking to make our way back to the main trail. While thrashing about the underbrush, I stepped on a wasp’s nest in the ground and got stung on my knee (hence the tears). I took two adult-strength Benadryl pills (always a must in your first-aid kit) without thinking. It wasn’t until I was completely stoned out of my mind that I remembered I can only take infant-formula Benadryl – you know, the liquid kind that tastes like grape pop. Good times!
Main Trail
Once we turned right onto the main Tent Ridge Trail, we stayed on it until we returned to our car after another 9.1 KMs.
First, we climbed up through a thick forest, gaining a surprising amount of elevation despite not being on the open ridge.

Just before we broke out into the meadow, we came across an avalanche debris field that was still there in August! People ask how I get my kids to enjoy hiking, and the answer is simple: we make it fun. Snowball fight anyone?
At about the 3 km mark, we entered a wide flat meadow. This was our first real view of the impressive Tent Ridge.

The meadow in the centre of Tent Ridge. The highest point on the ridge is straight ahead. You can see the kids making the left turn to start the ascent up the left ridge.
From here, we veered off to the left, and gained some more elevation through the trees. We enjoyed this final shady area as we knew we wouldn’t be getting another break until we were almost back at the car.
Once through the trees, we arrived at the base of Tent Ridge. This is the most fun on the entire hike. I put away my poles, and got ready for some hands-on-rock action.

The larches signaled we were now getting above tree line. The scramble section is directly above here.
If you’re super talented like my hubby Mike, you go up this with your hands in your pockets. If not, then feel free to cling to the side like I did. Seriously, this is super fun, with no real exposure. I even managed it while high as a kite on antihistamine. True, the mountain did keep moving, and the rocks looked pixelated… The kids were laughing, but Mike had to keep me on task more than once as I drifted off into fairyland.

The scramble section lasts until you reach the top of the ridge. Some route finding is required, but it’s pretty clear which way to go.
Once through the scramble bit, we were on the wide ridge and hiked up to the weather station.
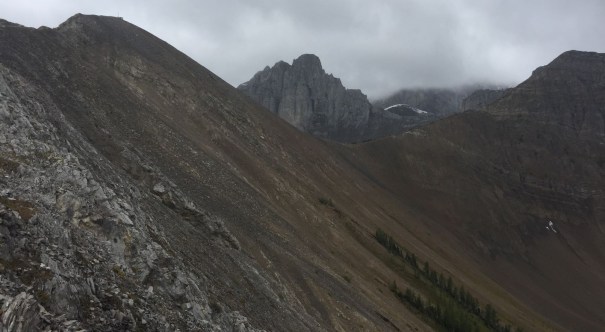
Still on the scramble part, looking up to the first summit with the weather station. Across is the highest peak, with The Fist making an impressive show from behind.

Nearing the weather station, the ridge widens out and it’s now a straight-forward hike to the top of the first peak.
Heading up the ridge, we looked down onto Mount Engadine Lodge’s deck and imagined ourselves enjoying a cold one in a few hours.

Mount Engadine Lodge below. The route to Rummel Lake across the highway, with Mount Galatea looming overhead.
I always think the area beside the weather station will make an ideal lunch spot, but I can never quite get out of the wind. I’ve walked down the side of the ridge a ways, and that helps, but it’s still not ideal. If I were to do it again, I might have a very hearty snack at the base of the rocky start to the ridge, and then finish my lunch at the lake view point on the other side of the ridge.

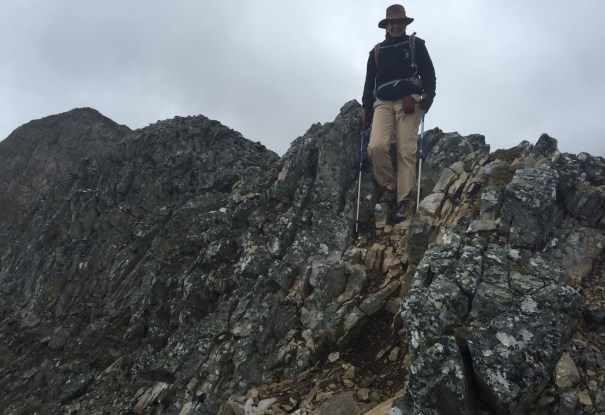
Annette and I making our way towards the summit or highest peak on Tent Ridge.
From the weather station, we made our way down to the low point on the ridge, and then began a long ascent to the main peak. This sounds daunting, and frankly it doesn’t look very appealing. However, this is one of the nicest trails up through a scree field. The main trail (it does braid, but we were able to stay on the main track) is nicely trampled, with lots of switchbacks. Plus the view is outstanding! The whole time we were treated to views of The Fist – which is not a sight you get every day.
On our second trip up Tent Ridge with the kids, there was a storm brewing. It was one of those all day affairs, that would build up, then dissipate. Build again, only to dissipate. The storm kept moving around, but never seemed to get any nearer or further away. Until we approached the summit. The storm now decided to move up close to Tent Ridge. Worse, it was turning into an electrical storm, which is always a problem on a mountain.
We checked our location, and made the decision to keep going forward as we were more than half-way. Safety was closer ahead than behind. We would have turned around if the storm came any sooner. We told the kids to run ahead as fast as they could, and they quickly disappeared into the distance. I was still stoned, and not moving at optimum speed.
As we neared the summit, I felt and heard a crackling in my ears. I thought it was another stoner symptom. When I mentioned it to Mike, he quickly whipped out his phone – to take a photo of me with my hair standing on end! The electricity was crackling all around us, and it quickly became a very terrifying experience. We were caught in an electrical storm once before in Kokanee Glacier Provincial Park. A tree was struck and set on fire in front of us, so we knew how bad it could get.

Electrical storm brewing! It is a very distinct sensation of electricity cracking through my ears. It is heard and felt. If you have metal poles and they start to sing or vibrate, throw them as far away from you as possible. I practice hurtling my ice axe for just such storms.
We put away all electrical devices, and checked for any metal. My poles are carbon fiber and were not vibrating. If they were, I would not have hesitated to huck those suckers as far away as possible!
The cracking continued for a good five minutes as we continued along the ridge. Then the storm dissipated again. Whew. I never like to mess around with weather on a mountain, and this was way too close of a call.

At the summit of Tent Ridge, looking down into the meadow below. You can see the Smith Dorrien Trail snaking along. The final ridge is to the left.
After this, I was fully sober as we continued at a good pace along the ridge. This side is really good fun. There are multiple opportunities to scare the daylights out of yourself as you look straight down the edge of the ridge on the right.

Annette can really frame a shot. This is looking down into the valley below, just off from the summit high point.

Mike is a climber and true mountaineer, so heights do not bother him. I’m getting ill just looking at this photo.
This ridge can be incredibly windy, especially in the fall. Annette and I wore everything in our packs (and Annette even wore some stuff from Mike’s pack!) and still barely stayed warm.
There is lots of going up and down rock outcrops. This was a fun bit of route-finding as we chose between staying high with some down-climbing, or losing elevation to avoid the problem altogether.
Annette coming down one of the rocky outcrops. You can see several of them behind her. This does make travel trickier, and can slow you down. There is usually a by-pas route on the left side.
Looking across to our original starting ridge and the weather station. The first and final ridges are at about the same elevation.

I have to say, the weather station ridge looks way more impressive from this view.
The furthest end of the ridge is an expansive view of the Spray Lakes. The wind seems to be less here, and is a great spot to finish eating our lunch.

A stormy fall day, with Mount Nestor lit up from a sucker hole.
Tent Ridge Return
As we looked down from the end of the ridge, we saw the trail simply go straight down a forlorn and barren slope with nary a switchback to help the old knees. This was a grin-and-bear-it moment, although I was eternally thankful I wasn’t grinding up it.

Alisen stopping to put on her knee braces. Using poles and braces has made a world of difference to my ability to hike, and not be laid up for two days recovering.
Once off the steepest part of the wide open slope, the trail does a split. One trail heads sideways across the face of the hill. Do not take this route. We tried it the first time and it does not seem to go anywhere. We backtracked to our staring point.
This wide open area is an avalanche slope in the winter. Please do not come here. The angle is very steep, there are no trees to hold the snow, and it slides often with very little provocation.
We took the trail that continues straight down. We soon re-entered the forest. This trail is indeed straight down, and a pain in the knees.
We stayed on this trail until it intersected with the old logging road. Turning right, we trudged along for about 700 meters, occasionally meeting a few late start hikers who took the bait and headed up this trail. Just when we thought we made a wrong turn, we crested the top of the little hill and saw our vehicle patiently waiting for us.
Tent Ridge horseshoe loop is one of the most enjoyable ridge hikes in all of Kananaskis Country. If you have already done Pocaterra Ridge, then come on over and do this one.
For a really civilized end to your day, I highly recommend stopping in at Mount Engadine Lodge for a cold drink and a hot appetizer. Sit on the deck, admire the views, and spin tales of daring-do.
Happy Trails!
Alisen
Totals – Tracked on Strava
Date: August 2nd, 2018
Group: Alisen, Mike, twin daughters, and two nephews
Distance: 10.88 KM
Elevation: 755 m (2,492′)
Time: 4 hours 15 minutes

The trail starts and ends off the old logging road. There is a bit of a hike to access the ridge, then it’s a view-filled traverse across to the other side.

Once you gain the main elevation on the highest peak, you get to maintain it along the final ridge walk. It is very steep down from the final ridge, on a mostly barren landscape with not much to recommend it. I’m glad it’s the downhill and can get it over with quickly.
I love all things mountains! I live next door to the Canadian Rocky Mountains, however I travel the world to enjoy the many different mountain environments and cultures that I can. I hope you enjoy these trip reports, and that it inspires you to accomplish your own adventure goals.

Leave a comment