July 7, 2019
My husband Mike and I had hiked up to the Mount Burke fire lookout the previous fall (October 24, 2018), and absolutely loved the changing terrain that kept us motivated. We decided to come back the following summer with our daughters and do the entire traverse. I particular liked the historical pack horse trail that serviced the people staying at this lonesome hut for a couple of reasons. First, as soon as you hear “horse trail” you just gotta know it’s a well graded trail. Second, I loved finding the historical artifacts on the trail left over from this by-gone era. Without pyramids or coliseums in Alberta, we have to take our brief human history where and how we find it. This fire lookout was replaced by the Raspberry Ridge fire lookout across the way, which is also a great hike in this area.
Overview
The Mount Burke Fire Lookout is a moderate there and back day hike. It is easy to get to, especially if you live south of Calgary as I do, but because of it’s location probably sees less traffic than some of the other fire lookouts, like Barrier or Moose. The trail itself – once you find it – is straight-forward, and has one or two interesting spots on the ridge below the hut. If you are hiking, then turn around and come back the way you came.
If you are doing the scramble traverse, then continue across the wide ridge to the north of the hut, gain the North summit of Mount Burke, and then pick you way down the ridge back into the trees. You will need to do lots of trail finding, and be good at down-climbing as these ridges tend to just drop off. It’s a matter of navigating your way through the forest, following the creek for some of it, until you eventually wind your way back to the far end of the Cataract Creek campground to walk back to your vehicle.
Trail Head
Make your way to Cataract Creek Campground (not to be confused with Cat Creek day use area) on Highway 940. If the campground is closed (as it was when I hiked this route in October), park your vehicle at the gates and start walking up the flat road towards the campground. If the gates are open, then continue driving. Immediately before the campground, there is an open field on your right. Park here for Mt. Burke.
Follow the trail leading out of the parking lot that parallels Slater Creek. After about 300 m, you come to a cairn and a Y junction decision point. We went left, which immediately starts to climb up a small ridge. This leads to views of a logged out area that makes me think of ski turns… Follow this trail gradually up, and you’ll hit a completely unnecessary dip. Once across this, you will start the “Straight Forest Slog.” This is about 1.5 kms of uncompromising elevation gain through a replanted forest with nary a switchback, view or change of tree to keep you entertained.

The cut line through the replanted forest makes for a quick, but boring short cut up the mountain. This 1.5 kms of perfectly planted pines is knick-named this SFS – Straight Forest Slog. However, there is an identical SFS on the North Burke side, which I was eternally grateful for!
To avoid this, you can go straight at the Y decision point. I believe this is the original pony trail for Mount Burke, and it connects with the top of the SFS. This trail is longer, with the same elevation gain, but I imagine it’s a lot nicer. I wouldn’t know though, because I chose the SFS route on both trips. So obviously I have short-term memory loss, or it wasn’t that bad.
Main Trail
Either way you go, where the trails meet up is on the original pack horse trail to the lookout. This is a really enjoyable trail, with a nice grade, lots of switchbacks, and interesting views. Being above the replanted forest, we appreciated the large and diverse trees. This area has never been logged, and it’s nice to see an original growth forest in Kananaskis Country.
Watch for the wire that comes all the way down from the lookout. It’s hard to imagine a telephone or electricity at the hut, but it must have been somewhat comfy for those living there for months at a time.

This wire continues almost all the way to the lookout. It is nicely off to the side of the trail, so not a tripping hazard.
Once we hit the tree line, the landscape changed to a wide open slope that interchanged between grass and scree. The trail through the scree was pretty good when I kept my eye on the main trail. It’s easy to get off it, but there were also enough cairns to keep me focused.

At the tree line. Scree and rocks to the top from here. This is a great view of Mt. Burke North, including the very sharp Iron Throne or Tower (left side of middle hump in photo) that gave us some trouble on the down climb.
I did find one cairn that serves no other purpose other than to draw you over to the left side (north). From here, we got our first views of the Burke Fire Lookout. I made my kids go over there, and the complaining immediately stopped when they saw the view. Parent 1, Kids 0.

The clever person who erected this cairn made it match the roof angle of the hut. I just love finding mountain art. Warms my heart.
Now the fun really starts. We hiked to the left of the ridge, and made our way up a narrow slot to gain the ridge top. Thinking about taking a pack horse up here gave me the heebee geebees. There is a long, nasty and death-ensuring cliff on your left if you lose your footing, and a shorter but equally damaging fall to the right.

I really can’t imagine a horse up here, but my horsey friends assure me a good mountain horse would be fine.

Looking back at Mike on the same spot. The route is up from the right. Mike is holding one of many steel posts that used to hold up the wire.
However, the ridge is also the fun bit, so I put the horses out of my mind, and enjoyed the final push up to the look out. We tried to make it as interesting as possible by staying on top of the ridge. Others may choose the trails to the right of the ridge to avoid exposure. This may be advisable during bad weather. In October, I was wearing all my clothing (for the ascent!) and had a very short and frigid lunch at the hut.

The lookout ridge is really good fun. We went higher up on top of the ridge, but there were lots of trails to the south (right) of the ridge with no exposure.
The Mount Burke fire lookout is now a badly dilapidated building that has been abused by generations of hikers. There are no windows, and the inside walls and floors are badly damaged or missing. There really is not much wind protection on a blustery day. On my October ascent, we had wind gusts easily up to 100 km/hr. The wind caught my small day pack more than once and almost threw me sideways.

The Mount Burke Fire Lookout. The guy wires securing the hut in the high winds are snapped on the left side. This hut will eventually collapse.
We arrived at the summit of Mount Burke in 2 hrs, and 30 minutes, just over 6 km, and about 849 m (2,800′) of elevation gain. The height of Mt. Burke is 2,391 m (7,890′).
My daughter Mackenzie is a budding photographer and took this cool shot through the door of the hut, looking at our next objective – the north summit of Mount Burke.

The floor of the fire lookout is ripped up, and pretty rotten. Pack rats have eaten the walls away. I huddled on the floor trying to get as much wind protection as possible.
Traverse to Mount Burke North Summit
From the lookout, we had to backtrack down the trail to avoid the sizable cliff to the north and east that the hut is built upon. We got low enough to traverse around it, so turned east again.
It was on this section that I found several very old tin cans. These must have been thrown out the door of the hut after dinner was served. It looks like the tins were pried open, and the contents perhaps cooked in the can?

Possible dinner for the fire spotter?
We soon hit a bit of a down climb, but that might have been avoided if we were either a bit higher or lower.

Kayla making her way across the down climb area. I think when you traverse from north to south, the trail might miss this part. From above, we couldn’t see another way.
We now had the entire traverse across to the north summit in front of us. This was very enjoyable and quick as we lost elevation. The trail was in good shape, and led us across without incident.

Mike leading the way. In the far distance you can see the big wall right before the summit. This looks intimidating up close, but if you go to the right, there is a lovely little path up the back. No worries.
Near the end of the traverse was a big vertical rock face that we had to go up or get around. It looked intimidating, but when we walked around to the east side, there was a nice little hike up the inside. We were up in no time, then a short walk across to the summit.

Me, Mackenzie and Kayla on Mount Burke North. The main Mt. Burke is behind us, and quite a bit higher up. You can see the long rock and scree slope that then enters the forest and heads south.
The traverse was about 2.3 km (total KM to this point is 8.3), with a 163 m (538′) elevation loss, and a 93 m (306′) gain.
Mount Burke North Return
I was not looking forward to an unknown and extensive bushwhack to get back to the campground, and I seriously considered simply returning to the main summit and going down the way we came. Instead, I sucked it up and we headed off down the ridge.

We followed the ridge all the way into the trees. We continued through the forest until we had no choice but to head into the forest, where we found some trail markers.
The trip down was a complete unknown. I have since read that most people go the opposite way – hike up to the north summit first, and then traverse across to the main summit. Oops. Being in the mountains is an adventure and route finding is an essential part of the skill set. Since we went counter-clockwise, now everyone has a different view point on this trip.
There are several ridges that end in drop offs, which was impossible to see until we were looking over the edge. Most of them we could find a way down without too much trouble. Except for one which we named The Iron Throne, and Gillean Daffern calls The Tower. There is a perfectly good by-pass route to the south, but we didn’t see it from above, plus we had already gone down the length of it. We backtracked a bit, and tried going down the south side. This was near vertical, and quickly became a bad idea. We went back up, and headed back up the ridge for a bit (because heaven forbid we regain ALL our elevation loss). We found another way down the south side. While it was still pretty darn steep, it was safer than our original attempt. From here, we picked our way down to the by-pass route.

The Iron Throne or Tower. The by-pass route is to the right. We picked our way down the right side.
There were still some ridges to get over. While they look intimidating from this view, the way down was a non-event.

More ridges. These look bad, but were more fun as the way down was pretty easy.
After this, we followed the ridge line down into the forest. This section was better than expected, with a slight trail through the trees. We stayed on the edge of the ridge for as long as we possibly could, as we were not keen to head north and cut into the forest, which would quickly turn into a major bushwhack.
We reached the end of the ridge where it started to turn south, so we went straight into the forest. It was here that I saw the most amazing sight. There was a white painted rock! I walked over to it, and behold! There was another white rock a little ways away. We followed these white rocks down and to the right. The rocks brought us to the cut line in the replanted forest. This was exactly the same as the cut line we ascended on the way up – the SFS! I was very happy to find this, as it meant no bushwhack. However, the forest gave a bit too. There were large stones covered in moss and well camouflaged. The four of us took turns stepping on these and having our feet swing out from under us.
The cut line ended at the unnamed creek, which was exactly where we needed to be. We continued along the creek, sometimes with a faint trail, sometimes nothing.

Mike and Mackenzie making their way down beside the creek. The trail was pretty darn good.
We stayed with the creek until it made a big right turn. I don’t think we were exactly on point, but we did cross a big field with bushes. Mike got trapped by these, and it actually took a bit of work to get him back up.

Mike caught in the thick bushes.
We continued more or less straight, until we came to the end of the Cataract Creek campground. This is site #73, and marks the entrance/exit point for the North Summit.
From here, we simply walked through the campground, and made our way back to our car.
Mount Burke and the Burke Traverse are both excellent day trips. The views are gorgeous, the trails are interesting and a bit challenging. If you do this trip, or have already done it, please let me know which direction you went, and how it went.
Happy Trails!
Alisen
Totals – Tracked on Strava
Mount Burke Return:
Date: October 24, 2018
Group: Alisen & Mike
Distance: 12.81 km (from gate on road, campground was closed)
Elevation: 756 m (2,494′)
Time: 5 hours
Mount Burke to North Summit Loop:
Date: July 7, 2019
Group: Mike, Alisen, Kayla & Mackenzie
Distance: 13.65 km
Elevation: 1,055 m (3,482′)
Total Time: 6 hours, 40 minutes

The route to Mt Burke is a there and back hike. The traverse across to the north summit is more of a challenge, with some scrambling and route finding.
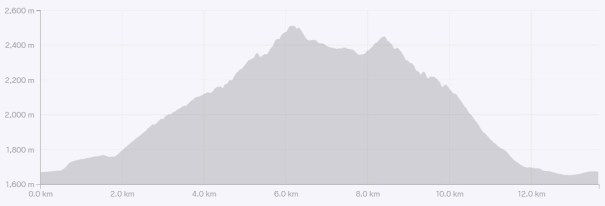
The elevation profile shows a nice and steady incline. You can see the various ridges on the descent off the north summit.
I love all things mountains! I live next door to the Canadian Rocky Mountains, however I travel the world to enjoy the many different mountain environments and cultures that I can. I hope you enjoy these trip reports, and that it inspires you to accomplish your own adventure goals.

Leave a comment