September 26, 2016
November 1, 2018
The Raspberry Ridge fire lookout replaced the old Mount Burke lookout across the highway. It is further west than Mount Burke, and a bit lower. The lookout building is in the newer style like the one found at Barrier, and has a helipad instead of an easy pack horse trail.
I’ve hiked Raspberry Ridge twice, both times in the fall. It is quite a bit south, and seems to avoid the early season snowfalls that make hiking difficult in the more northern areas of Kananaskis. I bet it’s lovely up here all summer though. Due to my fall adventuring, I’ve only ever encountered one other group up here. So if you want solitude, come here midweek in the fall.
Overview
There are several options to gain Raspberry Ridge, but they all start and end at the same place. I’ve done two out of the three. The “Direct” route goes straight up as you would expect, but it does take you through interesting rock terrain and a nice selection of White Bark Pine trees. There is the “Relaxed” route that cuts across the elevation gain. You go through grass lands, and get a longer, very enjoyable ridge walk through the trees. I took this route on the way down. The third option is the “South” ridge trail. As expected, you cut way south to the creek, and then have to gain the ridge. From the look of the tight contour lines, this is just as steep as the Direct route. I have not done this route.
Trail Head
Take Highway 40, and turn south onto Highway 940 at the Highwood House store. This turn-off is before the gates, so you can drive into this area all winter. The trail head is at the start of a logging road that is gated off. Park in the open area. If you’re the first one there, please leave room for big trucks hauling horse trailers.

Raspberry Ridge trail head is conveniently located on Google maps. You can see the trail system up to Raspberry Ridge to the left of the highway. If you continue down the highway, you get to the Mount Burke trail head (when the campground is closed).
To access the Direct, Relaxed and South routes, follow the road past the gate. Continue on the road until you come to an open area. The Direct and Relaxed routes turn right, and begin to climb immediately up through the forest. Look for the post on the right that marks the trail, as it’s not immediately obvious.
The South route keeps going straight for another 500 m or so, and then turns right to follow the creek on the right (north) side. The road crosses the creek and keeps going, so avoid that. After about 2.5 KM, the trail heads up the south end of Raspberry Ridge, getting very steep half way up. The trail then intersects with the Relaxed, and then the Direct routes.
Direct and Relaxed Main Trail
Once you are on the main trail for the Direct and Relaxed routes, simply follow the very strong trail. You will take a big curve to the south, which has lovely views. At around .7 km, the trail dips down close to the creek. After this, the trail is all uphill.

The lower trail is all in the forest. Raspberry Ridge is glimpsed through the trees.
At about 3 to 3.4 km, the trail splits. There is a very large cairn here, so as long as you’re not chit-chatting too much, you should see it. It is also a very definite Y in the trail.

This is the cairn that marks the Y intersection. At this point, the trail has left the forest, and you are on grassy slopes.
The Relaxed route goes left (southerly). It is 2.4 km to reach the ridge and then continue on to meet up with the Direct route. This route follows the contour lines in a more gentle uphill diagonal grade. This trail intersects with the ridge trail above. Once on the ridge, turn right (north) to follow the trail up the ridge, gaining elevation the entire way. This trail is in the forest, so would be nice on a very hot summer day.

I am thinking the Relaxed route was the original way up to the ridge. The Direct route is a shortcut that was added later.
The Direct route goes right (northerly) at the cairn. It heads straight up towards the ridge, crossing all the contour lines. It is about 1 km from the cairn to the ridge.

The Direct route cuts the distance by about 1.5 km, but makes up for it in direct elevation gain.
The Direct route might not sound like much fun, but it is very enjoyable! Yes, it’s straight up, but the trail twists and winds the whole way. There are incredibly beautiful and interesting rock formations almost the entire way.

Just one of the many interesting rocks formations on the Direct route. It’s steeper, but more to look at than the Relaxed route.
Plus, there is a very healthy selection of the endangered White Bark Pine trees. Please be careful when passing these. They are incredibly slow growing, and take forever to reach reproduction maturity.

The rocky crest of Raspberry Ridge is above us. The White Bark Pine trees are hugging the exposed slope, which is where they thrive. Eventually these trees will create an entire eco-system of shrubs, which will then lead to spruce and regular pines.
The direct route heads straight for a little notch in the ridge. I felt a little like the Bear that Went Over the Mountain because the view was always looking straight into the side of the ridge. When we got to the top of the ridge, guess what we saw? We saw another mountain!

The Notch is the little dip in the ridge. It looks a bit daunting from below, but is no problem.

Sue and Annette coming up through the notch to gain Raspberry Ridge. In the background is Mount Burke (middle peak) and the Mount Burke North summit (left peak).
Once on top of the ridge, there is a little cairn marking the notch should you wish to descend this way. We turned right, and joined the ridge trail heading to the fire lookout. No matter which trail you took, all three trails are now together again at this spot.
The Fire Lookout
From the Direct route notch, it is an enjoyable 500 m up to the fire lookout, and the little viewpoint beyond. It is very windy on this west side with no trees, so both times I did not linger.

Sue and Annette making their way up to the Fire Lookout. This is a great view to the south.
Keep an eye out for the artwork. There is a small statue above the cairn guiding you up to the lookout.

I think someone is loving their job. This statue wasn’t here the first time I did the trail.
Once at the fire lookout, there is an old TV with a cricket (I think!) inside. If you know who did this art installation, please leave me a message in the comments below!

Someone has a great sense of humour. Perhaps the fire lookout person found a use for some of the old stuff in the fire lookout?
Most fire lookouts ask people to stay clear, as the fire spotters are trying to do their job. If you are here in the summer during fire season, please respect their privacy. As I was there after fire season and the lookout was closed, I went up to check it out.

Please respect the Fire Lookout’s privacy. Do not engage or approach unless invited.
For my two trips up here, I took the Direct route both times. First trip was 2 hours, 20 minutes, and the second trip was 2 hours even. Direct route distance on Strava was 5 KM. The lookout is at 2,359 m (7,741′), and we gained about 610 m (2,013′) of elevation.

Compared to the old wooden hut at Mount Burke, this fire lookout is positively modern. One look at the wind sock shows why I didn’t linger here, and chose to eat lunch further down.
There are some lovely lunch spots below the fire lookout, but it was too windy in the fall to enjoy them. Instead, I went down the east side the ridge a bit to get out of the wind.

Lunch of Champions! This is what happens when you hike the day after Halloween.
Return
On my first trip, I took the Relaxed route back down. My friend Sue had both hips replaced and can climb like anyone! However, she still has terrible knees, so we decided to take the less steep Relaxed route back down.
We continued past the Direct route cairn, and entered the forest on the right side of the ridge. Be careful to stay high, and don’t get drawn down the right (west) side of the ridge. There are lots of animal trails here.

This is the ridge on the west (right) side of the ridge. The trail was sometimes faint. I was worried about losing it altogether, so kept a close eye on the map.
After a while, we crossed over to the left (east) side of the ridge, and got a gorgeous view of the creek below and the South route.

Once we crossed over to the left (east) side of the ridge, the trail was very obvious. Great view down the grassy slopes to the creek and logging road below.
There were quite a few places were people had left the ridge and made their way down. I supposed if I had come up this way, I would have seen where the Relaxed trail intersects with the ridge trail. But I didn’t, so I chose a random trail heading down. This was not ideal, because of the side hill-ing we had to do. We eventually got low enough, and hit the Relaxed trail, which was very nice indeed!

Sue picking her way down the grassy slope. This was not ideal. I’d stay on the ridge trail until you hit the very obvious Relaxed route.
From here, we simply stayed on the Relaxed trail, until we hit the Y intersection cairn. We then followed the main trail back to the trail head.
I hope you enjoyed this trip up Raspberry Ridge. It is a very enjoyable trek through a part of the Rockies and Kananaskis Country that a lot of people do not get to see very often. If you are looking for a relaxed hike, away from the crowds, consider the drive to Raspberry Ridge.
Happy Trails!
Alisen
Totals – Tracked on Strava
Direct Route Up and Relaxed Route Down:
Date: Sept. 30, 2016
Group Size: 3 (Alisen, Annette and Sue)
Distance: 11.4 km
Elevation: 664 m (2,191′)
Time: 4 hours, 40 minutes
Direct Route there and back:
Date: Nov. 1, 2018
Group Size: 2
Distance: 10.2 km
Elevation: 664 m (2,191′)
Time: 3 hours, 45 minutes
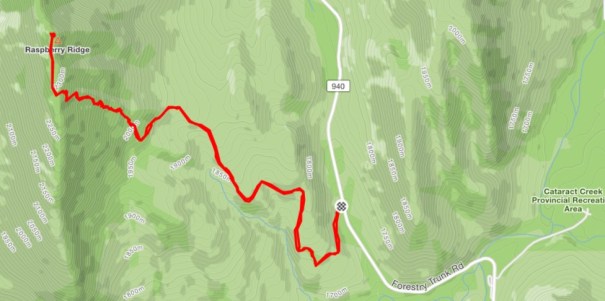
This is the Direct Route. You can see the Y turn-off to the Relaxed route at the sharp right turn, just below the straight up section.

This is the elevation profile for the Direct route only. At around the 2,000 m mark, we began the direct uphill. I imagine if you took the Relaxed route the elevation profile would match the lower section of the trail, and it would be a decent grade from top to bottom.
I love all things mountains! I live next door to the Canadian Rocky Mountains, however I travel the world to enjoy the many different mountain environments and cultures that I can. I hope you enjoy these trip reports, and that it inspires you to accomplish your own adventure goals.

Leave a comment