July 30, 2020
I love finding new mountains to climb. Sometimes I troll topo maps looking for likely candidates, while others I spy from the road. I first saw Mount Roberta in 2018 while driving home from a different hike.

This is the view of Mount Roberta as you travel south towards Highwood Pass. This section of the road is closed from mid-December to the end of June.
When I got home and looked it up, I knew I absolutely had to climb it. That’s because this pointy outcrop at the end of the Pocaterra Mountain ridge has it’s own name – Mount Roberta! Roberta is my mother-in-law’s name. Her husband Franz Dopf is a local legend for his early mountaineering and skiing feats. He is featured in several books, including “The Yam” and “Deep Powder and Steep Rock” by Chic Scott. However, Roberta is no slouch. When she emigrated to Canada from England in her early twenties, Roberta knew nothing about climbing, and had never seen snow. She threw herself into her mountaineering education and was soon climbing and ski touring like a pro. She is still one of the best skiers I have ever seen.
Just like the real Roberta, this mountain is short and spicy! All the trip reports I read detailed a heinous bushwhack, and a challenging descent gully. This is true. I now understand why people choose to tackle Mt. Roberta on the shoulder season with a good snow base. However, there is a trail in there. It’s faint, and we lost it numerous times, but it’s there.
Gear
Mount Roberta is a thick bushwhack requiring GPS and route finding skills. It’s also a scramble to the summit, and a technical descent through a tight gully with impressive rock fall. A helmet is required, especially if there is more than one group on the mountain. A lot of people tackle this mountain as a shoulder season ascent, so bring gators, poles and your regular day pack kit.
Overview
From the parking lot, cross the bridge and follow the road around the big bend. Once past the gully, ascend Mt. Roberta to the col. Turn left, and scramble up to the summit. Return via the gully you avoided on the way up.
Trail Head
The trail head is right off Highway 40, and has a small parking lot. It is directly across from Gap Mountain. Cross-country skiers will know it as the Kananaskis Fire Lookout Trail. There is a road, but it is closed.

The parking lot for Mt. Roberta. Highway 40 is up to the left.
From the parking lot, go past the gate, and head down towards Elpoca Creek.

The bridge over Elpoca Creek.
Main Trail
Cross the bridge, and continue straight. Be bear aware here. We saw footprints in the mud, and more than enough scat to keep ourselves alert. It’s worth knowing that across the road at El Poca, the wardens put out road kill for bears to feast on. This keeps the bears away from livestock and people, but also keeps them close to this area.
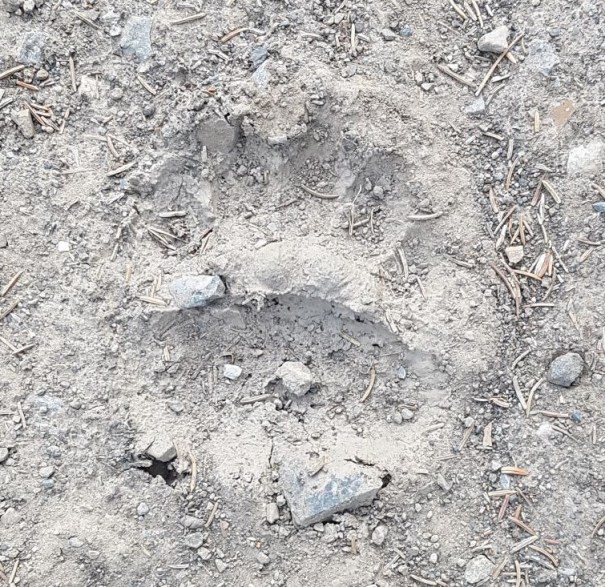
A bear footprint in the baked mud. There was also lots of freshly deposited scat.
At the bend, turn left. We were surprised to see a trail sign here. There is a whole network of cross-country ski trails here that connect the Pocaterra Hut with the Bolton Creek Campground.

The trail on the right is a flat trail that leads to Pocaterra Hut. I think it’s mostly used in the winter for cross-country skiing, but who am I to judge? It might be ideal for small kids or bikes. Go left here for Mt. Roberta.
After about 1 km you come to a culvert. This is your cue to look to the left to find the faint trail heading up the side of Mount Roberta.

After turning left, we soon came to the culvert. We actually missed the turn off and had to back track a few meters. If you go straight, I believe this will take you up to the Kananaskis Fire Lookout. Once past the culvert, look up into the bushes to find the faint trail.
Considering I was prepared for a full on bushwhack, I was thrilled with the little trail.

There are definitely sections with a pretty strong trail. There is also some tree blazing done to help winter travelers.
We hiked up to a bench. From here, we should have turned right to find the ridge. Instead, we followed the trail straight. At some flagging, we turned right. This was now full bushwhack. We realized our mistake, and made our way up and back to the right until we hit the ridge.

I would be amiss if I didn’t show some photos of the bushwhack. The willowy brush was choking at some points. On the way back, I got stuck and was actually pulled down into a willow thicket.

Other places saw lots of dead fall, brush, and general bramble.
The ‘trail’ on the ridge meanders in and out of the forest. The mosquitoes were insane – really, the worst I’ve seen in a long time. Every time we stopped to check the route, our legs were covered with swarms of mosquitoes. Despite a generous dose of bug spray, a brave little biter would dive bomb onto my hand for a quick nibble.

Our first respite on the ridge. This is an open avalanche slope. Above, the ground slumped, taking out the trail. This made for a steep side step. Be aware here in the winter.
It was also incredibly hot. Despite an early start, and being in the shade of the mountain, we were soaked through from heat. So whenever we had a chance to hike along the edge of the ridge, we took it.

From here on up, we were more or less on the ridge and in the open.

We found this open slope with a pretty good trail through the scree. Mike is squeezing the mosquitoes out of his hair.
The col is about 3 km from the trail head, and took us 2 hours. We stopped to admire the views (first ones we had) and put on our helmets.

View of the col as we approached. The summit ridge is on the left.

The view from the col to the east. Directly in front is Pocaterra Ridge – the hiking route. In the background, Mt. Rae is poking up it’s head. Pocaterra Mountain is connected to Mt. Roberta to the right of the col.
The scramble up to the summit is about 500 m, and is very enjoyable. There is a trail through the screen to the left, or you can go straight up the rocks.

There is a proper trail through the scree on the left of this outcrop. However, we went straight up. This little rocky outcrop is one of the only enjoyable aspects of the mountain. We made the most of it.

The obligatory screen ascent.

Looking across at the summit. A short ridge walk.
The summit is about 3.5 km from the trail head. Elevation gain is 596 m. Time to summit was 2 hours and 20 minutes (20 minutes past the col, and includes scenery gawking).

View from the summit of Mount Roberta looking to the north. Gap Mountain dominates our view. Looking down, we are still the only car in the parking lot.
There was a brisk breeze at the top, which we used to disperse the cloud of mosquitoes that had followed us up from the forest. We had a light snack, but still lingered. We realized we were killing time, not wanting to face the biting swarm awaiting us below.
That’s okay though, because Mt. Roberta provides views that you normally would not see. Directly to the West is a beautiful panorama of Kananaskis Lakes. Above the Upper Lake on the left is the uber popular Sarrail Ridge, and on the right is Mount Indefatigable. In the middle is Mt. Lyautey. Poking out from behind is the impressive Mount Northover, which many people do as a multi-day backpack.

From left to right – Sarrail Ridge, Mt Northover (behind), Mt. Lyautey, and Mt. Indefatigable.
Slightly to the left are some popular ski trails. This is a view I never thought I’d get to see! Foreground hill is Kananasks Fire Lookout, while the second hill across the valley is Blueberry Hill, which overlooks Kananaskis lakes. This whole area is the extensive Kananaskis cross-country ski trail system.

I skied up to the Kananaskis Fire Lookout over 20 years ago, and have never been back. I honestly didn’t even really know where it was. Now I know! Blueberry Hill is the smaller and further hill, and I ski there every year.
Mount Roberta Return
From the summit, retrace your steps back to the col.

Looking back down towards the col from the summit. The ridge continues on the other side to Pocaterra Mountain.
At the col, you can return the way you came. Or, you can descend via the gully, which we chose. I was hoping for a nice and quick screen run out. and then a short jaunt through the forest to the road. My wish did not come true.

At the start of the gully.
The gully is quite tight, and the scree is a mix of rocks sizes. We accidentally sent a good sized rock down, and we could hear it tumble for a disturbingly long time.
At one point, there is a pretty good step down in the gully. The tight gully gave lots of hand holds though.

There is a bit of down climbing needed.

The gully decides to get nice and tight. Unfortunately, the scree was uneven so travel was a pain. Also, there is another drop that you wouldn’t want to fly over by accident. It’s a big enough of a drop to ruin your day.
Below the gully, we were spat out onto a massive scree slope.

Directly below the gully is a wide open scree slope. I’m pretty sure all roads lead to Rome from this spot. The hard part is picking the best route down.
From here, we traversed across to the right. There are a series of scree descent routes to choose from. We went to the furthest right, and then down. I’d recommend taking one of the routes further left, as ours was not very good. I’m not saying the others will be better!

The last scree run out on the right.

At the bottom of the final scree run out, looking back up to the impressive face of Mount Roberta.
Once at the bottom of the scree run out, we angled to the right a bit. We eventually found the fairly wide trail through the forest that would lead us back to the highway.

Despite the trail being fairly big here, we did manage to lose it and regain it a few times. Frustrating, but we knew where we wanted to go.
Near the base of the mountain, we came to a delightful moss covered fairyland. After the hot, bug infested forest, this was the first real beauty we had seen since the summit views.

The north facing slopes are covered with spongy moss. It was cooler here, less buggy, and no thick bushes to whack your face and arms.
At Elpoca Creek, we again lost the trail. The creek crossing was further to our right, but as we were hot and so close to the car, we said screw it and just waded across the creek at a low point.

Elpoca Creek at a low point. There were two stream crossings, then a boggy area, followed by a log jam.
Once across the creek, we were rewarded with a good sized log jam, which we clambered over. If you can find the trail across the creek, I’d suggest taking it. Finally, we hit Highway 40. We turned left, and made our way back to the car.

Still not a lot of traffic on this Thursday morning. Most cars moved over, but a few odd people thought it best to hug to white line, despite no oncoming traffic.
Yes, Mount Roberta is short in terms of distance and elevation gain, but she more than makes up for it by throwing in as many challenges as possible. If you scramble up Mount Roberta, please let me know how you did in the comments.
If you found this post useful, please do me a huge favour and click the Star button to “Like” it. You can also follow my blog, follow me on Instagram, or join my FaceBook page Al’s Adventurers.
Alisen
Totals – Tracked on Strava
Date: July 30, 2020
Group: Two (Alisen and Mike)
Distance: 6.9 km
Elevation: 678 m (2,237′)
Time: 4 hours 30 minutes (includes a leisurely summit lounge)

Mount Roberta can be a There and Back, or done in a loop. Despite its easy access, good route finding skills and a tolerance for bushwhacking are required.

The route up is a steady slog, while the down section is punctuated by steep slopes where you lose a lot of elevation fast.
I love all things mountains! I live next door to the Canadian Rocky Mountains, however I travel the world to enjoy the many different mountain environments and cultures that I can. I hope you enjoy these trip reports, and that it inspires you to accomplish your own adventure goals.

I’m avoiding mosquito hikes – although they should lessen as we get into Fall. Although I’m Scottish, you’re clearly made of hardier stuff than me!!!!
Other than Cobalt Lake in the Bugaboos, these were the worst mosquitoes I’ve ever had. I do think (hope!) the bloom is over.
Hey – I was thinking of you when I posted the Midnight Peak Traverse last week. Have you done it? I think it might be right up your alley.
No, we haven’t done it. It looks like quite a bit of scrambling? We did Miners Peak during the week (I’ve done Ha Ling many times but never Miners Peak which actually gives a great view of Ha ling) and today we wanted something easy so did Rae Glacier.
If you don’t do the loop, but descend the way you came, there is no hands on rock. Or, you can just go to the pass. No steeper than Ha Ling, you just have to work a little harder to find the trail once you are on the scree.
Miners Peak sounds lovely. I love getting a new perspective on an old mountain.
Great info. Thanks. Definitely one to try then 🙂 I think Smutwood Peak is the next on our list. Burstall Pass is one of my favourites, and this looks even more spectacular.
wow! such beautiful scenery. how long was the hike? how long did it take you?
I believe it was 4.5 hours return. It was only 7 km, but some route finding and bushwhacking made it take a bit longer than usual.
Thank you very much for the beautiful photographs and the lovely description of your trekking.Take care.🌹👍🙏
Welcome friend! Thank you very much. I’m so glad you liked it. I wish you many adventures of your own.
How lovely it is!!!!